Actividad 4 - Desarrollo de un microservicio RESTful
El objetivo de esta actividad es desarrollar un microservicio RESTful utilizando Spring Boot. A diferencia de la actividad anterior donde se usó Jersey y WildFly, en este caso se utiliza el framework Spring Boot con su servidor embebido Tomcat, Thymeleaf para las vistas HTML y PostgreSQL como base de datos.
1. Inicialización del proyecto
Section titled “1. Inicialización del proyecto”El proyecto se crea utilizando Spring Initializr,
seleccionando Maven como sistema de build, Java como lenguaje y la versión de
Spring Boot por defecto. Como metadatos del proyecto, se establece el grupo
es.dwsc y el artefacto sampleprojectmicro.
package es.dwsc.sampleprojectmicro;
import org.springframework.boot.SpringApplication;import org.springframework.boot.autoconfigure.SpringBootApplication;
@SpringBootApplicationpublic class SampleprojectmicroApplication {
  public static void main(String[] args) {    SpringApplication.run(SampleprojectmicroApplication.class, args);  }
}<?xml version="1.0" encoding="UTF-8"?><project xmlns="http://maven.apache.org/POM/4.0.0" xmlns:xsi="http://www.w3.org/2001/XMLSchema-instance" xsi:schemaLocation="http://maven.apache.org/POM/4.0.0 https://maven.apache.org/xsd/maven-4.0.0.xsd"> <modelVersion>4.0.0</modelVersion> <parent> <groupId>org.springframework.boot</groupId> <artifactId>spring-boot-starter-parent</artifactId> <version>4.0.4</version> <relativePath></relativePath> <!-- lookup parent from repository --> </parent> <groupId>es.dwsc</groupId> <artifactId>sampleprojectmicro</artifactId> <version>0.0.1-SNAPSHOT</version> <name>sampleprojectmicro</name> <description>Demo project for Spring Boot</description> <url></url> <licenses> <license></license> </licenses> <developers> <developer></developer> </developers> <scm> <connection></connection> <developerConnection></developerConnection> <tag></tag> <url></url> </scm> <properties> <java.version>17</java.version> </properties> <dependencies> <dependency> <groupId>org.springframework.boot</groupId> <artifactId>spring-boot-starter</artifactId> </dependency> <dependency> <groupId>com.fasterxml.jackson.core</groupId> <artifactId>jackson-annotations</artifactId> </dependency> <dependency> <groupId>org.springframework.boot</groupId> <artifactId>spring-boot-starter-web</artifactId> </dependency> <dependency> <groupId>org.projectlombok</groupId> <artifactId>lombok</artifactId> <optional>true</optional> </dependency> <dependency> <groupId>org.postgresql</groupId> <artifactId>postgresql</artifactId> </dependency> <dependency> <groupId>org.springframework.boot</groupId> <artifactId>spring-boot-starter-test</artifactId> <scope>test</scope> </dependency> <dependency> <groupId>org.springframework.boot</groupId> <artifactId>spring-boot-starter-thymeleaf</artifactId> </dependency> </dependencies> <build> <plugins> <plugin> <groupId>org.springframework.boot</groupId> <artifactId>spring-boot-maven-plugin</artifactId> </plugin> </plugins> </build></project>1.2. Base de datos
Section titled “1.2. Base de datos”Se utiliza Docker Compose con una imagen de PostgreSQL para levantar una base de datos relacional para la actividad.
Primero se crea el script init.sql que define la tabla sampleusers e
inserta los datos iniciales.
CREATE TABLE IF NOT EXISTS sampleusers (    username VARCHAR(50) PRIMARY KEY,    password VARCHAR(100) NOT NULL,    dni VARCHAR(20) NOT NULL,    name VARCHAR(100) NOT NULL,    surnames VARCHAR(200) NOT NULL,    age INT NOT NULL);
INSERT INTO sampleusers (username, password, dni, name, surnames, age) VALUES    ('juan', 'juanpass', '12345678D', 'Juan', 'Lopez Garcia', 31),    ('jose', 'josepass', '12345678B', 'Jose', 'Perez Rodriguez', 33),    ('javi', 'javipass', '12345678A', 'Javier', 'Criado Rodriguez', 35);
Después se crea el archivo docker-compose.yml que configura el servicio
PostgreSQL con el usuario estudiante, la contraseña estudiante y la
base de datos dwsc.
services:  postgres:    image: postgres:18.3-alpine3.23    environment:      POSTGRES_DB: dwsc      POSTGRES_USER: estudiante      POSTGRES_PASSWORD: estudiante    ports:      - "5432:5432"    volumes:      - postgres_data:/var/lib/postgresql/data      - ./src/main/resources/init.sql:/docker-entrypoint-initdb.d/init.sql
volumes:  postgres_data:
2. Ejercicio propuesto
Section titled “2. Ejercicio propuesto”El microservicio debe implementar las siguientes operaciones:
- Una operación para obtener la lista de usuarios en formato JSON.
- Una operación para visualizar la lista de usuarios en una tabla HTML.
- Una operación para obtener los datos de un usuario particular en formato JSON.
- Una operación para visualizar los datos de un usuario en una capa HTML.
- Una operación para insertar usuarios.
2.1. Lista de usuarios en formato JSON
Section titled “2.1. Lista de usuarios en formato JSON”-
Crear los modelos de dominio
Se crea la clase
User.javacon los atributos del usuario:username,password,dni,name,surnamesyage. También se crea la claseUsers.javaque extiende deArrayList<User>para representar una colección de usuarios.User.java package es.dwsc.sampleprojectmicro.domain;import lombok.Getter;import lombok.Setter;@Getter@Setterpublic class User {private String username;private String password;private String dni;private String name;private String surnames;private int age;}Users.java package es.dwsc.sampleprojectmicro.domain;import java.util.ArrayList;public class Users extends ArrayList<User> {} -
Crear el servicio
Se crea la interfaz
UserService.javacon el métodogetUsersFromDB()y la implementaciónUserServiceImpl.javaque establece una conexión JDBC con PostgreSQL y ejecuta la consulta SQLSELECT * FROM sampleusers ORDER BY age.UserService.java package es.dwsc.sampleprojectmicro.service;import es.dwsc.sampleprojectmicro.domain.Users;public interface UserService {public Users getUsersFromDB();}UserServiceImpl.java package es.dwsc.sampleprojectmicro.service;import java.sql.Connection;import java.sql.DriverManager;import java.sql.ResultSet;import java.sql.SQLException;import java.sql.Statement;import org.springframework.stereotype.Service;import es.dwsc.sampleprojectmicro.domain.User;import es.dwsc.sampleprojectmicro.domain.Users;@Servicepublic class UserServiceImpl implements UserService {@Overridepublic Users getUsersFromDB() {Users users = new Users();Connection conn = this.connect2DB();try {Statement st = conn.createStatement();ResultSet rs = st.executeQuery("SELECT * FROM sampleusers ORDER BY age");while (rs.next()) {User user = new User();user.setUsername(rs.getString("username"));user.setPassword(rs.getString("password"));user.setDni(rs.getString("dni"));user.setName(rs.getString("name"));user.setSurnames(rs.getString("surnames"));user.setAge(rs.getInt("age"));users.add(user);}rs.close();st.close();} catch (Exception e) {System.err.println("[UserService - getUsersFromDB] SQLException while querying the users");System.err.println(e.getMessage());}return users;}private Connection connect2DB() {Connection conn = null;try {Class.forName("org.postgresql.Driver");String url = "jdbc:postgresql://localhost:5432/dwsc";conn = DriverManager.getConnection(url, "estudiante", "estudiante");} catch (ClassNotFoundException e) {e.printStackTrace();} catch (SQLException e) {e.printStackTrace();}return conn;}} -
Crear el controlador
Se crea
UserController.javacon el endpointGET /usersque devuelve la lista de usuarios en formato JSON gracias a la anotación@ResponseBody.UserController.java package es.dwsc.sampleprojectmicro.controller;import java.util.Map;import org.springframework.beans.factory.annotation.Autowired;import org.springframework.stereotype.Controller;import org.springframework.web.bind.annotation.RequestMapping;import org.springframework.web.bind.annotation.ResponseBody;import es.dwsc.sampleprojectmicro.domain.Users;import es.dwsc.sampleprojectmicro.service.UserService;@Controllerpublic class UserController {@Autowiredprivate UserService userService;@RequestMapping("/userstable")public String getUsersTab(Map<String, Users> model) {Users users = userService.getUsersFromDB();model.put("users", users);return "usertemplate";}@RequestMapping("/users")public @ResponseBody Users getUsers() {return userService.getUsersFromDB();}} -
Comprobar el endpoint
Se puede comprobar el endpoint que devuelve la lista de usuarios en formato JSON.
Terminal curl -X GET http://localhost:8080/usersresponse.json [{"username": "juan","password": "juanpass","dni": "12345678D","name": "Juan","surnames": "Lopez Garcia","age": 31},{"username": "jose","password": "josepass","dni": "12345678B","name": "Jose","surnames": "Perez Rodriguez","age": 33},{"username": "javi","password": "javipass","dni": "12345678A","name": "Javier","surnames": "Criado Rodriguez","age": 35}]
2.2. Tabla HTML de usuarios
Section titled “2.2. Tabla HTML de usuarios”-
Crear la plantilla Thymeleaf
Se crea
usertemplate.htmlensrc/main/resources/templates/con la directivath:eachde Thymeleaf para iterar sobre los usuarios y mostrar una tabla HTML.usertemplate.html <html><head><title>Users</title><link rel="stylesheet" type="text/css" th:href="@{/css/style.css}" /><linkhref="http://fonts.googleapis.com/css?family=Roboto:400,100,100italic,300,300italic,400italic,500,500italic,700,700italic,900italic,900"rel="stylesheet"type="text/css"/></head><body><div><table><tr><th>Username</th><th>DNI</th><th>Name</th><th>Surnames</th><th>Age</th></tr><th:block th:each="user : ${users}"><tr><td th:text="${user.username}">...</td><td th:text="${user.dni}">...</td><td th:text="${user.name}">...</td><td th:text="${user.surnames}">...</td><td th:text="${user.age}">...</td></tr></th:block></table></div></body></html> -
Añadir los estilos CSS
Se crea
style.cssensrc/main/resources/static/css/con estilos para la tabla: fuente Roboto, bordes colapsados y colores alternos para las filas pares.style.css table {font-family: roboto, sans-serif;border-collapse: collapse;}td,th {text-align: left;padding: 8px;}th {background-color: #617563;text-align: center;}tr:nth-child(even) {background-color: #dddddd;} -
Crear el endpoint
Se crea el endpoint
GET /userstableque devuelve el nombre de la plantilla y Spring la renderiza con los datos del modelo.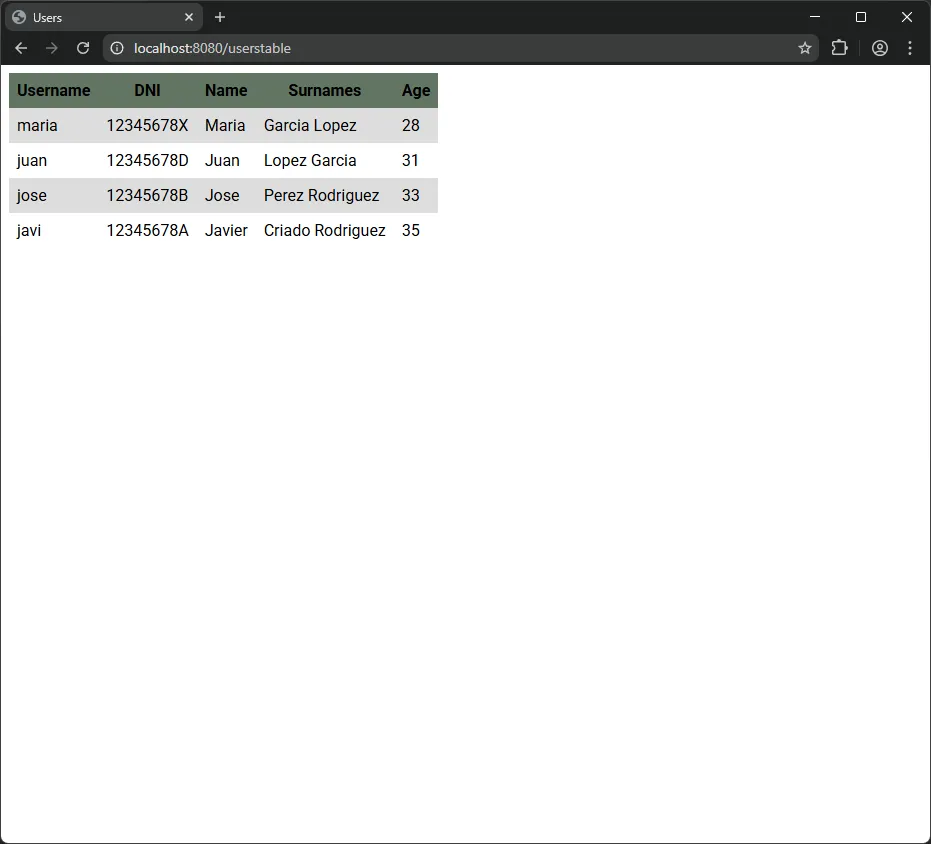
2.3. Usuario particular en formato JSON
Section titled “2.3. Usuario particular en formato JSON”-
Modificar el servicio
Se añade el método
getUserFromDB(String username)a la interfazUserServicey se implementa enUserServiceImplusandoPreparedStatementcon el parámetro?para evitar SQL injection.actividad4/src/main/java/es/dwsc/sampleprojectmicro/service/UserServiceImpl.java package es.dwsc.sampleprojectmicro.service;import java.sql.Connection;import java.sql.DriverManager;import java.sql.PreparedStatement;import java.sql.ResultSet;import java.sql.SQLException;import java.sql.Statement;import org.springframework.stereotype.Service;import es.dwsc.sampleprojectmicro.domain.User;import es.dwsc.sampleprojectmicro.domain.Users;@Servicepublic class UserServiceImpl implements UserService {@Overridepublic Users getUsersFromDB() {Users users = new Users();Connection conn = this.connect2DB();try {Statement st = conn.createStatement();ResultSet rs = st.executeQuery("SELECT * FROM sampleusers ORDER BY age");while (rs.next()) {User user = new User();user.setUsername(rs.getString("username"));user.setPassword(rs.getString("password"));user.setDni(rs.getString("dni"));user.setName(rs.getString("name"));user.setSurnames(rs.getString("surnames"));user.setAge(rs.getInt("age"));users.add(user);}rs.close();st.close();} catch (Exception e) {System.err.println("[UserService - getUsersFromDB] SQLException while querying the users");System.err.println(e.getMessage());}return users;}@Overridepublic User getUserFromDB(String username) {User user = null;Connection conn = this.connect2DB();try {PreparedStatement pst = conn.prepareStatement("SELECT * FROM sampleusers WHERE username = ?");pst.setString(1, username);ResultSet rs = pst.executeQuery();if (rs.next()) {user = new User();user.setUsername(rs.getString("username"));user.setPassword(rs.getString("password"));user.setDni(rs.getString("dni"));user.setName(rs.getString("name"));user.setSurnames(rs.getString("surnames"));user.setAge(rs.getInt("age"));}rs.close();pst.close();} catch (Exception e) {System.err.println("[UserService - getUserFromDB] SQLException while querying user: " + username);System.err.println(e.getMessage());}return user;}private Connection connect2DB() {Connection conn = null;try {Class.forName("org.postgresql.Driver");String url = "jdbc:postgresql://localhost:5432/dwsc";conn = DriverManager.getConnection(url, "estudiante", "estudiante");} catch (ClassNotFoundException e) {e.printStackTrace();} catch (SQLException e) {e.printStackTrace();}return conn;}} -
Modificar el controlador
Se añade el endpoint
GET /users/{username}con@PathVariableyResponseEntitypara devolver 200 OK si el usuario existe o 404 Not Found si no existe.actividad4/src/main/java/es/dwsc/sampleprojectmicro/controller/UserController.java package es.dwsc.sampleprojectmicro.controller;import java.util.Map;import org.springframework.beans.factory.annotation.Autowired;import org.springframework.http.ResponseEntity;import org.springframework.stereotype.Controller;import org.springframework.web.bind.annotation.GetMapping;import org.springframework.web.bind.annotation.PathVariable;import org.springframework.web.bind.annotation.RequestMapping;import org.springframework.web.bind.annotation.ResponseBody;import es.dwsc.sampleprojectmicro.domain.User;import es.dwsc.sampleprojectmicro.domain.Users;import es.dwsc.sampleprojectmicro.service.UserService;@Controllerpublic class UserController {@Autowiredprivate UserService userService;@RequestMapping("/userstable")public String getUsersTab(Map<String, Users> model) {Users users = userService.getUsersFromDB();model.put("users", users);return "usertemplate";}@RequestMapping("/users")public @ResponseBody Users getUsers() {return userService.getUsersFromDB();}@GetMapping("/users/{username}")public ResponseEntity<User> getUser(@PathVariable String username) {User user = userService.getUserFromDB(username);if (user != null) {return ResponseEntity.ok(user);} else {return ResponseEntity.notFound().build();}}} -
Comprobar el endpoint
Se puede comprobar el endpoint que devuelve un usuario particular en formato JSON.
Terminal curl -X GET http://localhost:8080/users/juanresponse.json {"username": "juan","password": "juanpass","dni": "12345678D","name": "Juan","surnames": "Lopez Garcia","age": 31}La respuesta devuelve un código
404 Not Foundsin contenido en el cuerpo de la respuesta.
2.4. Vista HTML de usuario
Section titled “2.4. Vista HTML de usuario”-
Modificar el controlador
Se añade el endpoint
GET /usertable/{username}que obtiene los datos del usuario y devuelve la plantillauserview.actividad4/src/main/java/es/dwsc/sampleprojectmicro/controller/UserController.java package es.dwsc.sampleprojectmicro.controller;import java.util.Map;import org.springframework.beans.factory.annotation.Autowired;import org.springframework.http.ResponseEntity;import org.springframework.stereotype.Controller;import org.springframework.web.bind.annotation.GetMapping;import org.springframework.web.bind.annotation.PathVariable;import org.springframework.web.bind.annotation.RequestMapping;import org.springframework.web.bind.annotation.ResponseBody;import es.dwsc.sampleprojectmicro.domain.User;import es.dwsc.sampleprojectmicro.domain.Users;import es.dwsc.sampleprojectmicro.service.UserService;@Controllerpublic class UserController {@Autowiredprivate UserService userService;@RequestMapping("/userstable")public String getUsersTab(Map<String, Users> model) {Users users = userService.getUsersFromDB();model.put("users", users);return "usertemplate";}@RequestMapping("/users")public @ResponseBody Users getUsers() {return userService.getUsersFromDB();}@GetMapping("/users/{username}")public ResponseEntity<User> getUser(@PathVariable String username) {User user = userService.getUserFromDB(username);if (user != null) {return ResponseEntity.ok(user);} else {return ResponseEntity.notFound().build();}}@GetMapping("/usertable/{username}")public String getUserHtml(@PathVariable String username, Map<String, User> model) {User user = userService.getUserFromDB(username);if (user != null) {model.put("user", user);return "userview";}return "error";}} -
Crear la plantilla con Bootstrap
Se crea
userview.htmlensrc/main/resources/templates/utilizando el tema Pulse de Bootstrap 5. La plantilla utiliza la clasetable-primarypara diferenciar el estilo respecto a la tabla de la tarea 2.userview.html <!doctype html><html lang="en"><head><meta charset="UTF-8" /><meta name="viewport" content="width=device-width, initial-scale=1" /><title>User Profile</title><linkrel="stylesheet"href="https://cdn.jsdelivr.net/npm/bootswatch@5.3.8/dist/pulse/bootstrap.min.css"integrity="sha256-o//3hBDveRLQUla4SY0ZWD9uGrNz8nJZc8cuqV7K81g="crossorigin="anonymous"/></head><body><div class="container py-5"><tableclass="table table-primary table-bordered mx-auto"style="max-width: 600px"><thead><tr><th colspan="2" class="text-center" th:text="${user.username}">Username</th></tr></thead><tbody><tr><th scope="row">DNI</th><td th:text="${user.dni}">...</td></tr><tr><th scope="row">Name</th><td th:text="${user.name}">...</td></tr><tr><th scope="row">Surnames</th><td th:text="${user.surnames}">...</td></tr><tr><th scope="row">Age</th><td th:text="${user.age}">...</td></tr></tbody></table></div><scriptsrc="https://cdn.jsdelivr.net/npm/bootstrap@5.3.8/dist/js/bootstrap.bundle.min.js"integrity="sha384-FKyoEForCGlyvwx9Hj09JcYn3nv7wiPVlz7YYwJrWVcXK/BmnVDxM+D2scQbITxI"crossorigin="anonymous"></script></body></html> -
Captura de pantalla

2.5. Insertar usuarios
Section titled “2.5. Insertar usuarios”-
Modificar el script SQL
Se añade la restricción
UNIQUEal campodnien el script SQLinit.sqlpara que la base de datos impida valores duplicados.actividad4/src/main/resources/init.sql CREATE TABLE IF NOT EXISTS sampleusers (username VARCHAR(50) PRIMARY KEY,password VARCHAR(100) NOT NULL,dni VARCHAR(20) NOT NULL,dni VARCHAR(20) NOT NULL UNIQUE,name VARCHAR(100) NOT NULL,surnames VARCHAR(200) NOT NULL,age INT NOT NULL);INSERT INTO sampleusers (username, password, dni, name, surnames, age) VALUES('juan', 'juanpass', '12345678D', 'Juan', 'Lopez Garcia', 31),('jose', 'josepass', '12345678B', 'Jose', 'Perez Rodriguez', 33),('javi', 'javipass', '12345678A', 'Javier', 'Criado Rodriguez', 35); -
Modificar el servicio
Se añade el método
insertUser(User user)a la interfazUserServicey se implementa enUserServiceImplverificando que ni el username ni el DNI existan previamente en la base de datos.actividad4/src/main/java/es/dwsc/sampleprojectmicro/service/UserServiceImpl.java package es.dwsc.sampleprojectmicro.service;import java.sql.Connection;import java.sql.DriverManager;import java.sql.PreparedStatement;import java.sql.ResultSet;import java.sql.SQLException;import java.sql.Statement;import org.springframework.stereotype.Service;import es.dwsc.sampleprojectmicro.domain.User;import es.dwsc.sampleprojectmicro.domain.Users;@Servicepublic class UserServiceImpl implements UserService {@Overridepublic Users getUsersFromDB() {Users users = new Users();Connection conn = this.connect2DB();try {Statement st = conn.createStatement();ResultSet rs = st.executeQuery("SELECT * FROM sampleusers ORDER BY age");while (rs.next()) {User user = new User();user.setUsername(rs.getString("username"));user.setPassword(rs.getString("password"));user.setDni(rs.getString("dni"));user.setName(rs.getString("name"));user.setSurnames(rs.getString("surnames"));user.setAge(rs.getInt("age"));users.add(user);}rs.close();st.close();} catch (Exception e) {System.err.println("[UserService - getUsersFromDB] SQLException while querying the users");System.err.println(e.getMessage());}return users;}@Overridepublic User getUserFromDB(String username) {User user = null;Connection conn = this.connect2DB();try {PreparedStatement pst = conn.prepareStatement("SELECT * FROM sampleusers WHERE username = ?");pst.setString(1, username);ResultSet rs = pst.executeQuery();if (rs.next()) {user = new User();user.setUsername(rs.getString("username"));user.setPassword(rs.getString("password"));user.setDni(rs.getString("dni"));user.setName(rs.getString("name"));user.setSurnames(rs.getString("surnames"));user.setAge(rs.getInt("age"));}rs.close();pst.close();} catch (Exception e) {System.err.println("[UserService - getUserFromDB] SQLException while querying user: " + username);System.err.println(e.getMessage());}return user;}@Overridepublic boolean insertUser(User user) {Connection conn = this.connect2DB();try {PreparedStatement checkUsername = conn.prepareStatement("SELECT * FROM sampleusers WHERE username = ?");checkUsername.setString(1, user.getUsername());ResultSet rsUsername = checkUsername.executeQuery();boolean usernameExists = rsUsername.next();rsUsername.close();checkUsername.close();if (usernameExists) {conn.close();return false;}PreparedStatement checkDni = conn.prepareStatement("SELECT * FROM sampleusers WHERE dni = ?");checkDni.setString(1, user.getDni());ResultSet rsDni = checkDni.executeQuery();boolean dniExists = rsDni.next();rsDni.close();checkDni.close();if (dniExists) {conn.close();return false;}PreparedStatement insert = conn.prepareStatement("INSERT INTO sampleusers (username, password, dni, name, surnames, age) VALUES (?, ?, ?, ?, ?, ?)");insert.setString(1, user.getUsername());insert.setString(2, user.getPassword());insert.setString(3, user.getDni());insert.setString(4, user.getName());insert.setString(5, user.getSurnames());insert.setInt(6, user.getAge());insert.executeUpdate();insert.close();conn.close();return true;} catch (Exception e) {System.err.println("[UserService - insertUser] Error inserting user: " + user.getUsername());System.err.println(e.getMessage());return false;}}private Connection connect2DB() {Connection conn = null;try {Class.forName("org.postgresql.Driver");String url = "jdbc:postgresql://localhost:5432/dwsc";conn = DriverManager.getConnection(url, "estudiante", "estudiante");} catch (ClassNotFoundException e) {e.printStackTrace();} catch (SQLException e) {e.printStackTrace();}return conn;}} -
Modificar el controlador
Se añade el endpoint
POST /userscon@RequestBodyyResponseEntitypara devolver 200 OK si la inserción es exitosa o 400 Bad Request si el username o DNI ya existen.actividad4/src/main/java/es/dwsc/sampleprojectmicro/controller/UserController.java package es.dwsc.sampleprojectmicro.controller;import java.util.Map;import org.springframework.beans.factory.annotation.Autowired;import org.springframework.http.ResponseEntity;import org.springframework.stereotype.Controller;import org.springframework.web.bind.annotation.GetMapping;import org.springframework.web.bind.annotation.PathVariable;import org.springframework.web.bind.annotation.PostMapping;import org.springframework.web.bind.annotation.RequestBody;import org.springframework.web.bind.annotation.RequestMapping;import org.springframework.web.bind.annotation.ResponseBody;import es.dwsc.sampleprojectmicro.domain.User;import es.dwsc.sampleprojectmicro.domain.Users;import es.dwsc.sampleprojectmicro.service.UserService;@Controllerpublic class UserController {@Autowiredprivate UserService userService;@RequestMapping("/userstable")public String getUsersTab(Map<String, Users> model) {Users users = userService.getUsersFromDB();model.put("users", users);return "usertemplate";}@RequestMapping("/users")public @ResponseBody Users getUsers() {return userService.getUsersFromDB();}@GetMapping("/users/{username}")public ResponseEntity<User> getUser(@PathVariable String username) {User user = userService.getUserFromDB(username);if (user != null) {return ResponseEntity.ok(user);} else {return ResponseEntity.notFound().build();}}@PostMapping("/users")public ResponseEntity<Map<String, String>> insertUser(@RequestBody User user) {boolean inserted = userService.insertUser(user);if (inserted) {return ResponseEntity.ok(Map.of("message", "User created successfully"));} else {return ResponseEntity.badRequest().body(Map.of("error", "Username or DNI already exists"));}}@GetMapping("/usertable/{username}")public String getUserHtml(@PathVariable String username, Map<String, User> model) {User user = userService.getUserFromDB(username);if (user != null) {model.put("user", user);return "userview";}return "error";}} -
Comprobar el endpoint
Se puede comprobar el endpoint para insertar usuarios.
Terminal curl -X POST http://localhost:8080/users \-H "Content-Type: application/json" \-d '{"username":"maria","password":"mariapass","dni":"12345678X","name":"Maria","surnames":"Garcia Lopez","age":28}'response.json {"message": "User created successfully"}error.json {"error": "Username or DNI already exists"}
3. Ejecución del proyecto
Section titled “3. Ejecución del proyecto”-
Iniciar la base de datos PostgreSQL
Primero se inicia el servicio de PostgreSQL con el siguiente comando:
Terminal window docker-compose up -d -
Ejecutar la aplicación Spring Boot
A continuación se ejecuta la aplicación Spring Boot con el siguiente comando:
Terminal window ./mvnw spring-boot:run -
Acceder a los endpoints
Por último se pueden comprobar los endpoints:
- JSON lista:
http://localhost:8080/users - Tabla HTML:
http://localhost:8080/userstable - Usuario JSON:
http://localhost:8080/users/juan - Usuario HTML:
http://localhost:8080/usertable/juan
- JSON lista: